Automated Sales Tax to the Rescue in QuickBooks Online
Automated Sales Tax to the Rescue in QuickBooks Online
Automated Sales Tax to the Rescue in
QuickBooks Online
Most accounting and financial professionals are aware of the complex sales tax structure that exists across the United States. With sales and use taxes being the responsibility of the individual states and counties, cities, and other taxing jurisdictions within those states, a complex and disorganized set of laws and regulations has arisen over the years. Further, the Supreme Court’s Wayfair decision is likely to lead to more businesses being required to collect sales taxes on transactions that cross state lines, leading to more compliance cost and complexity. However, if you are running QuickBooks Online, you have access to Automated Sales Tax (AST), a tool that you can use to streamline and simplify your sales tax billing, collection, reporting, and payment issues.
How Automated Sales Tax Works
As its name implies, AST is intended to automate as many sales tax-related tasks as possible. You merely need to answer a few questions up front such as where you are located, what types of products you sell, and where your customers’ locations, and AST takes over from there. Once you answer the necessary questions, the tool uses the following information to determine the tax rate to apply to an invoice.
Your home state.
Your physical address within your home state.
The physical address on the invoice or sales receipt.
Whether the items on the invoice are subject to sales tax.
Whether your customer is exempt from sales tax.
Setting Up Automated Sales Tax in QuickBooks Online
To set-up AST, begin by clicking Taxes followed by Sales Tax in the left side tab. Next, enter your company’s physical address and then indicate whether you sell products outside your home state. You will be prompted to enter information such as when you started collecting taxes in that jurisdiction and how often you file tax returns for that jurisdiction. If you have additional sales tax agencies you need to setup, just click Add Agency and you will be prompted for the relevant information.
For each item you sell, you will need to indicate whether the item is taxable and if it is, does it have any special tax characteristics. Examples of special characteristics include whether the item is food or beverages and if it is, whether it is a carbonated beverage, which is subject to special taxes in some jurisdictions.
Also, for each of your customers, you will need to indicate their billing address and their shipping address, if it is different. If a shipping address is supplied, it will be the one used to calculate sales taxes. Additionally, you will need to indicate whether a specific customer is exempt-from sales taxes and if so, the nature of the exemption – governmental exemption, religious organization, etc. Once all the above items are established, you are ready to begin using Automated Sales Tax.
Using Automated Sales Tax in QuickBooks Online
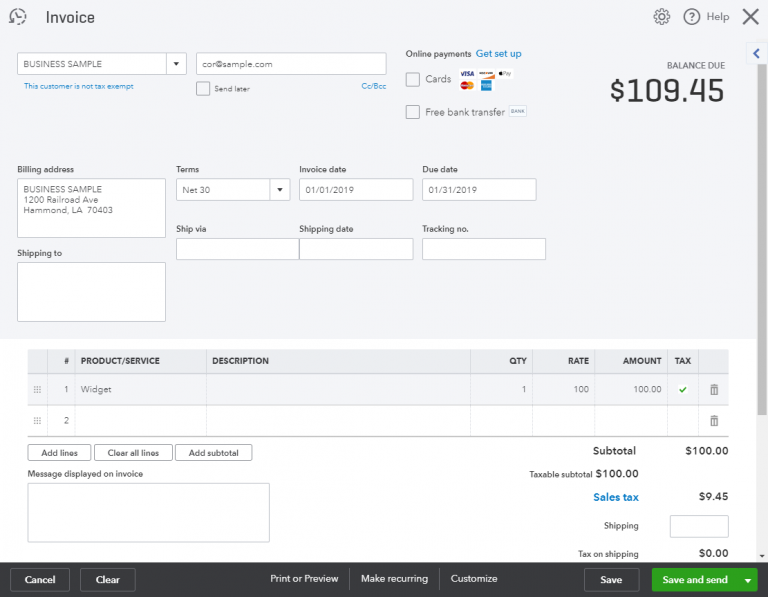
Having configured AST as described previously, you issue your invoices (or sales receipts) to customers as you always have done in QuickBooks Online. Only now, all the tax calculations are done based on the information provided by AST. For example, in the invoice shown in Figure 1, the customer’s sales tax of $9.45 was driven by the billing address because no shipping address was provided.
Figure 1 - Billing Sales Tax in QuickBooks Online Using Automated Sales Tax
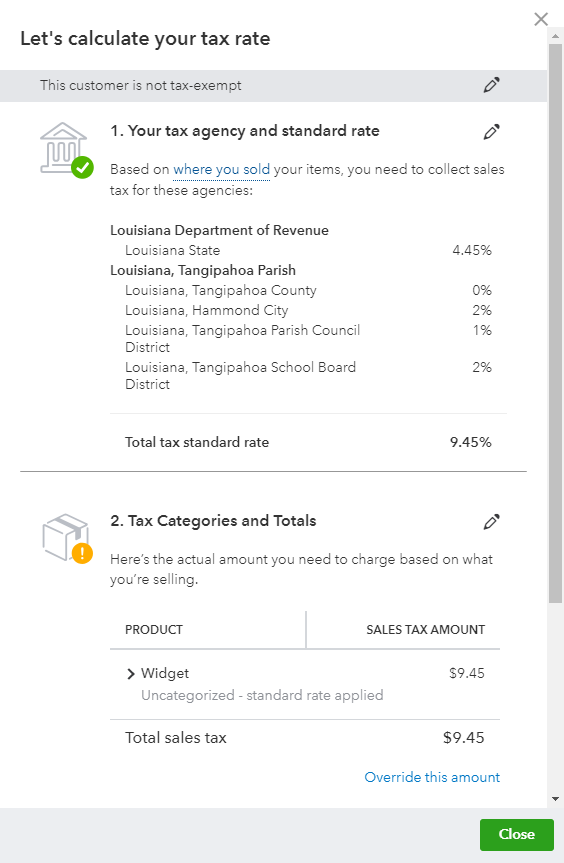
Clicking the Sales Tax link near the lower right corner of the invoice opens the task pane shown in Figure 2. As you can see, that pane provides a detailed summary of how the tax was calculated.
Figure 2 - Details of Sales Tax Calculation Produced by AST
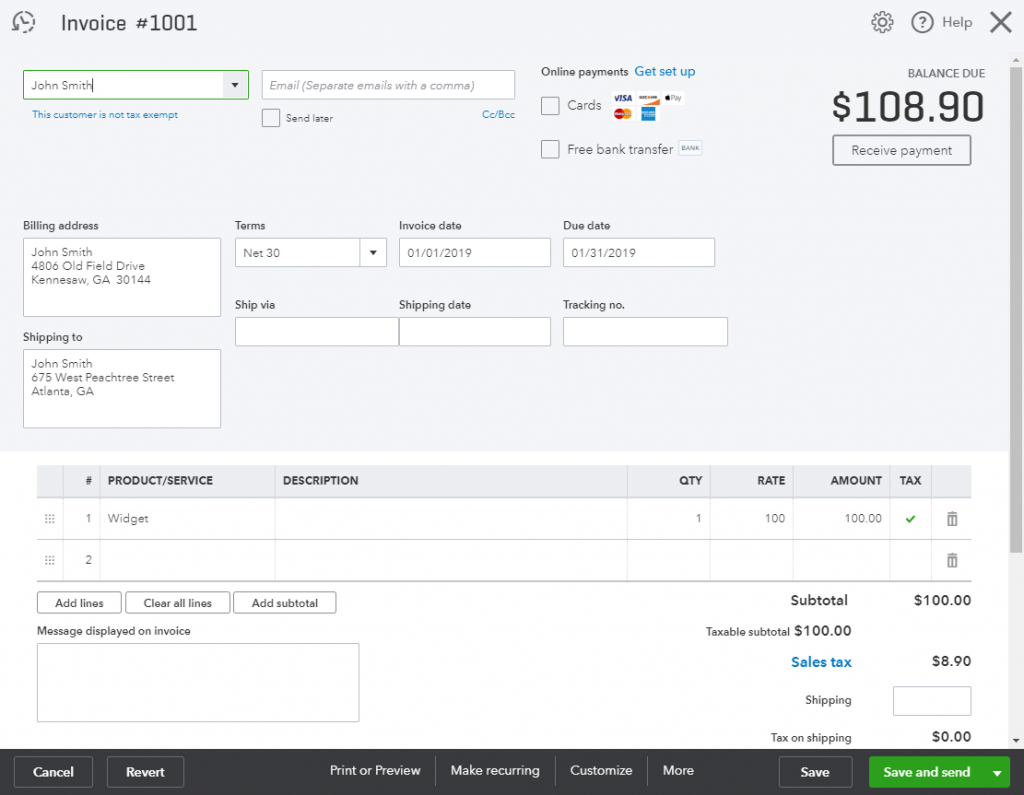
In the invoice shown in Figure 3, the tax is calculated based on the customers shipping address, not the billing address. Of course, this is because the shipping address field was populated in this illustration, whereas it remained blank in the prior example.
Figure 3 - AST-billed Sales Tax Based on Shipping Address
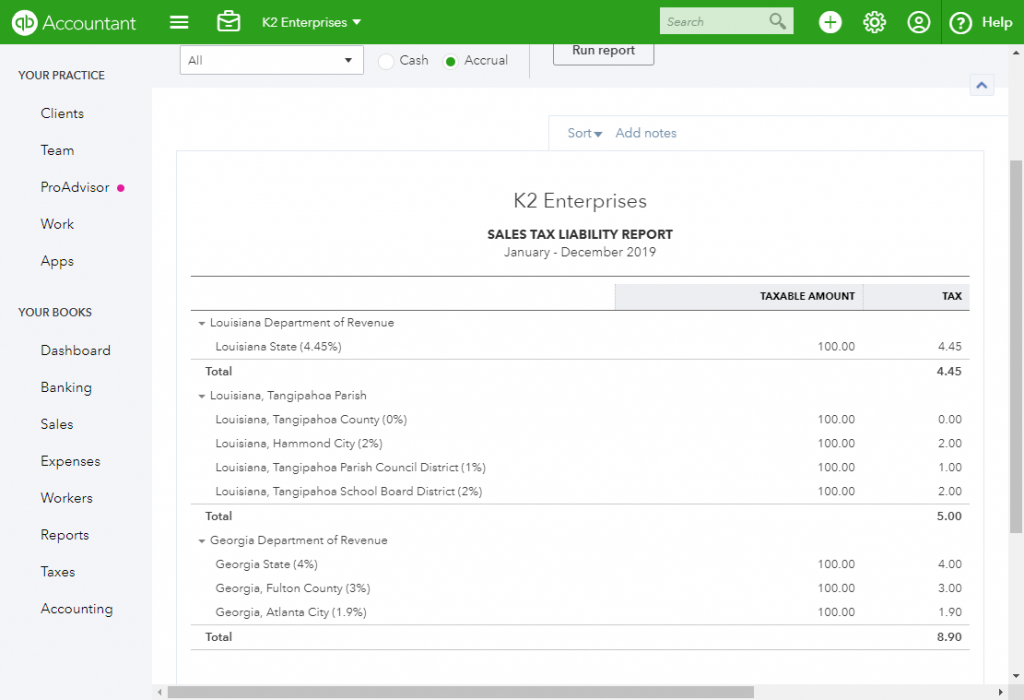
Finally, you can generate the Sales Tax Liability Report in QuickBooks Online to assist you in preparing your sales tax returns. Figure 4 illustrates that report, based on the two invoices recorded in this illustration.
Figure 4 - Sales Tax Liability Report in QuickBooks Online
Sales tax compliance is increasingly becoming a major headache for many small business owners and managers. Trying to stay on top of over 10,000 different tax rates in the United States – all of which are subject to periodic changes – is a virtual impossibility. Fortunately, for QuickBooks Online-based businesses there is some relief for those who choose to utilize the Automated Sales Tax tool embedded in the service.
You can see Automated Sales Tax in action by watching the video below.
We use cookies to ensure that we give you the best experience on our website. Continuing to use this website acknowledges your consent to our privacy policy.Understood.Privacy policy