Securing Power BI Dashboards
Many business professionals are turning to Microsoft’s Power BI platform to address reporting, analysis, and business intelligence efforts. As they do, one question that many have is how to secure a Power BI dashboard. After all, security is a prime concern for all business professionals today. It is an issue that we must address when dealing with virtually any type of sensitive and confidential data. Read on, and in this article, you will learn how you can secure the data in your Power BI dashboards.
Power BI Security Fundamentals
Power BI addresses security perhaps a little differently than what most users would expect. First, if you are using the Power BI Desktop platform, there is no option contained therein allowing you to secure your reports. Even the straightforward process of adding a password to a Power BI Desktop report is not possible. Therefore, any security measures you add to a .PBIX file generated by Power BI Desktop are going to be self-created. Perhaps the most common of these methods is to store your .PBIX files in folders that you share in Windows with other team members who are authorized to access those reports. However, if you are publishing your reports to the Power BI cloud service, you can use two specific security features to keep data confidential. More specifically, you can take advantage of what Microsoft refers to as the Web Front End (WFE) cluster and the Back End cluster.
Addressing Authentication With The Web Front End
According to Microsoft, the WFE cluster manages the initial connection and authentication process for Power BI, using Azure Active Directory to authenticate clients and providing tokens for subsequent client connections to the Power BI service. Power BI also uses the Azure Traffic Manager (ATM) to direct user traffic to the nearest datacenter, determined by the DNS record of the client attempting to connect, for the authentication process, and to download static content and files. This level of security is handled with virtually no end-user interaction required, other than entering usernames and passwords when logging in. The objective of the WFE is to ensure that only authorized users can access the data in a Power BI dashboard.
Using The Back End Cluster To Invoke Row-Level Security
The Back End cluster addresses security for all post-login user interactions with Power BI, such as working with data. The principal security technique provided in this cluster to prevent unauthorized access to data is Row-Level Security (RLS). Setting up RLS allows you to restrict on a user-by-user basis what each user can see when working with Power BI tiles, reports, dashboards, and data sets. At a high level, activating RLS involves the following five steps.
- Set up Roles in Power BI for each of your user groups.
- Add a Data Analysis Expression (DAX) to filter the data for each Role that you establish.
- Validate each Role in Power BI Desktop to ensure it is working as intended.
- Add members to each Role, as appropriate.
- Test and validate each role in Power BI Service.
As detailed below, these five steps involve executing some tasks in Power BI Desktop and others in the Power BI service.
Setting Up Roles
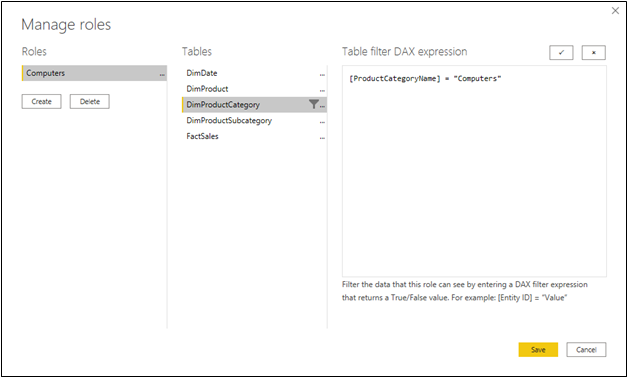
Assuming you have linked your data into Power BI Desktop, from the Modeling tab of the Ribbon, choose Manage Roles to begin the process of setting up roles in the application. In the Roles section of the Manage roles dialog box, click Create and enter the name for the role you are creating. Next, select the table that contains the data on which you want to apply a filter for this role. For example, if you want to create a role that limits a user’s ability to see data only for sales of Computers, you might choose to assign the name “Computers” to the role and then select the Product Category table so that in the next step, you will be able to add a DAX expression that filters the data accordingly.
Adding DAta analysis Expressions to filter data for each role
The next step is to create a DAX expression that filters the data visible in the role. In this example, we will create an expression that filters the data to Computers, as shown in Figure 1. By creating such a filter, the users to whom this role is assigned will be able only to see transactional data when the Product Category associated with each transaction is Computers. Click Save to complete the process of creating the role.
validating roles in power bi desktop
With the role created, you are ready to validate it in Power BI Desktop. To do so, select the checkmark near the upper, right corner of the dialog box. Then, click Save to complete the process of creating the role.
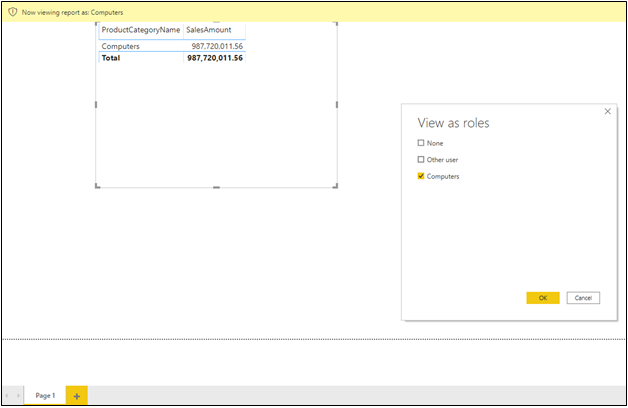
For additional validation of a role, create or open a report in Power BI. Then, click View as Roles on the Modeling tab of the Ribbon and select the role in the View as roles dialog box. Upon doing so, you should immediately see the report filtered so that viewing of non-allowed records – per the definition of the role – is not possible. Figure 2 illustrates how such a “testing” report might appear with the Computers role created above.
Add members to roles
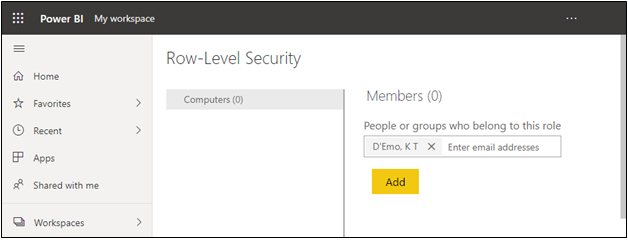
Although you create roles in Power BI Desktop, you do not assign them to users in this application. Instead, you assign users in Power BI Service. Once you publish your report to the service, access the dataset for the report and click the ellipses for the dataset, followed by selecting Security. Then, you can add the email addresses for each person to whom you want to assign the role, as shown in Figure 3.
Testing and Validating roles in power bi service
You can also test the application of the role in the Power BI Service. To do so, again click on the ellipses next to the dataset and choose Security. Then, click the ellipses next to the role you want to test and select the resulting Test as role option. Upon doing so, Power BI Service will display a simple report that shows the data filtered according to the specifications in the role.
Having created, tested, and applied the roles, from this point forward, any team members to whom a role is assigned will be able to see only the designated data in Power BI Service. This helps to ensure that unauthorized individuals do not have access to data that they should not see.
Summary
Securing sensitive and confidential data has never been more critical. Unfortunately, because there are no security features available in Power BI Desktop, many users mistakenly believe that they cannot secure their Power BI content. However, that is not the case. By taking advantage of the row-level security option, you can easily add an effective security regime to your dashboards. Further, you can fine-tune the roles you assign to users at a very granular level, helping to ensure that each team member has access to just the information they need. However, keep in mind that enabling this security regime requires activating features in both the desktop and cloud-based components of Power BI.
You can learn more about Power BI by participating in K2’s Business Intelligence, Featuring Microsoft’s Power BI Tools.