
Understanding Sensitivity Labels In Microsoft Office Applications
Although sensitivity labels are not a new feature in Microsoft Office applications, they remain underutilized and misunderstood by most business professionals. That is unfortunate because sensitivity labels provide great options for protecting a document’s privacy and security when properly deployed and used. Read on to learn more about sensitivity labels and how you can use them to enhance data security and privacy.
What Are Sensitivity Labels?
Sensitivity labels provide users with options to classify and protect data in Microsoft Office documents according to predefined policies. Once you “stamp” a document with a sensitivity label, the security policy associated with that sensitivity label protects the document’s information. Sensitivity labels are available in Microsoft 365 applications, and you must be signed in to your Microsoft 365 work or school accounts to use them.
You can use sensitivity labels to protect information in Word, Excel, PowerPoint, and Outlook if you’re using Office desktop apps. You can also use sensitivity labels to protect the information in web-based versions of Office applications. Further, sensitivity labels are supported in Windows, macOS, iOS, and Android environments.
In addition, you can extend your labels to protect the information in Power BI. You can also use sensitivity labels to protect information in Teams and SharePoint sites, if necessary. In this environment, you can set and enforce privacy settings and external user access and sharing options.
How To Create Sensitivity Labels
To create sensitivity labels, you must have Admin rights in your organization’s Microsoft Purview compliance portal. Assuming you possess those rights, navigate to the portal. Then select Solutions, Information protection, and Labels. Next, select Create a label to begin the process of selecting a new label.
The first action to take when creating a new label is to define its scope. You can configure the scope to be 1) Items, 2) Groups & sites, or 3) Schematized data assets. If you choose Items, you can apply your label to items such as Word and Excel documents. If you choose Groups & sites, you can apply the label to Microsoft 365 groups and sites for Teams and Sharepoint. Finally, if you choose to Schematized data assets as the scope, you can use it to label content automatically based on a Purview Data Map.
After selecting the label’s scope, you can specify its specific protection options. For example, you can choose from among the following options.
- Encrypt. If you choose this option, the sensitivity label encrypts emails and documents so that unauthorized users cannot access them. As part of this protection scheme, you can specify which user(s) or groups can access the information and for how long.
- Mark the content. This selection allows you to apply items such as watermarks, headers, and footers to your document. This feature can be used to add markings to documents but not to email messages.
- Protect content in containers such as sites and groups. Upon selecting this option, you can protect information from access by unauthorized users. Specifically, this option prohibits unauthorized users from accessing named storage locations.
- Apply the label automatically to files and emails, or recommend a label. This option allows you to choose how to identify sensitive information that you want to be labeled and apply the label automatically. Alternatively, you can prompt users to apply a label you recommend.
- Set the default sharing link type. With this option, you can prevent users from oversharing documents with too many participants.
Configuring Label Scopes
As you create your policies, you will also be prompted to create label scopes. These scopes control two items:
- Which label settings you can configure for that label, and
- Where the label will be visible to other users.
Label scopes allow you to create sensitivity labels that others can apply to documents and emails but not to containers, for example.
Additionally, you can create label priorities and sublabels, if necessary, to meet your specific needs.
Publishing Sensitivity Labels Via Label Policies
Upon creating your sensitivity labels, you can publish them by creating label policies. Upon doing so, you can begin using the labels to protect your information.
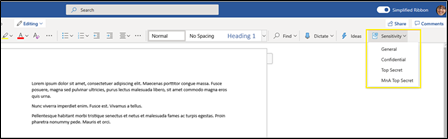
To create a sensitivity policy, choose Solutions, Information protection, followed by Label policies. Then select Publish label and Create policy. You will then be prompted to create your policy. Within 24 hours of publishing the policy, the label associated with it will be visible in your Office applications. To apply a specific sensitivity label to a document, click Sensitivity from the application’s Home tab and choose the policy you want to apply. From that point forward, the policy associated with the label will be in force.
Summary
Sensitivity labels are one of the more powerful security and privacy options available in Microsoft 365 environments. Unfortunately, many users remain unaware of their availability and presence and, therefore, are underutilized. However, as detailed above, getting started with sensitivity labels need not be an overwhelming task. Check back soon for more posts on this subject.
You can learn more about data security and privacy in a K2 Enterprises training event. Also, check out this article from Microsoft on sensitivity labels.